 These are for me "typical"
christmas candlestick to use for christmas, These are for me "typical"
christmas candlestick to use for christmas,
as a simple candlestick, candelaber or advents candlestick ..
| |
Before
you start... |
| - |
This
tutorial is made for PaintShopPro 7.0 , but works
in all versions. |
| - |
I
assume you know your PsP |
| - |
I
also assume you are used to working with layers.. |
| - |
I
named all my layers, but I don't mention it in
the tutorial |
| - |
Use
any colour you like .. |
| - |
Download
the zip file, it
contains the selections for the candel and the
gradient for the flame. |
| - |
Save
the Gradient in your \Paint Shop Pro 7\Gradient's
folder |
| - |
Please
don't take this tut and claim it as your own, or
use it in a collection or copy it .. |
| - |
Save
the image in psp format and you can try the candelaber and the advents candlestick to , (think about this) ... |
~¤ ~ ¤ ~ ¤ ~ ¤ ~ ¤ ~ ¤ ~
 Create a new image 200 x 250, Create a new image 200 x 250,
Width; 200
Height; 250
Backgroundcolour; transparent.
press OK
I used this red colours 
#FF0000 and #C00000 ..
Create a new layer, (then you can, if you want, go back
and fill with any colour or background you want when you
finished.)
1.
Use the Preset Shape tool, 
(Antialias checked for a "softer" edge)
Line Width dont matter. (becuase forgroundscolour should
be set to Null, see below)
"Create as vector"  checked, checked,
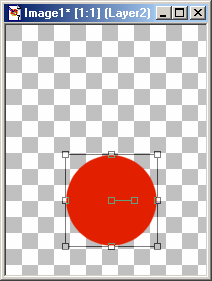  then you can
change the shape and size if you want,just pull one of
the nodes..) then you can
change the shape and size if you want,just pull one of
the nodes..)
Use a lightred for the backgroundcolour
(foreground set to "Null")
and make a circle, see image,
When "Create as vector" is checked
you get a "squared" selection around the
circle..
Move the mouse over the nodes, and the cursor changes ..
If the cursor looks like ...
 .. you can
"pull" in the corner and get the size you
want.. .. you can
"pull" in the corner and get the size you
want..
 .. you can
move the object.. .. you can
move the object..
make the size you want,
and move it to the lower part of the image..
2.
Choose
Layers - Convert to Raster Layer.
Choose
Selections - Select All
Selections - Float
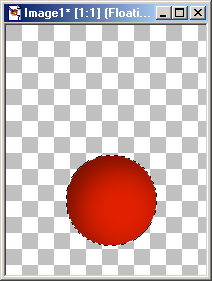
Now you have a "Floating Selection"
around your circle,
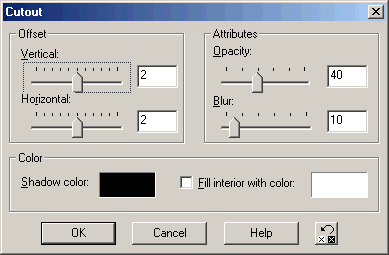
and to make it look lika a "spherical", you
need some Cutout ..
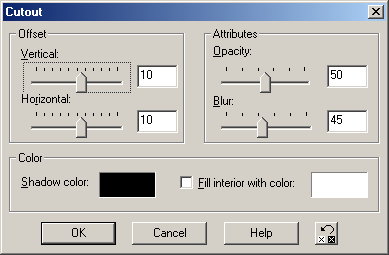
Choose Effects - 3D Effects - Cutout,
settings, see below..
Deselect ..
3.
 The feet.. and
when "Create as vector" is checked, the new
object, creates i a new layer .. The feet.. and
when "Create as vector" is checked, the new
object, creates i a new layer ..
Create a smaller selection filled with the same red colour,
place it move it to the lower part of the sphere ..
and to make the layer raster layer ....
choose ..
Layers - Convert to Raster Layer.
Selections - Select All
Selections - Float
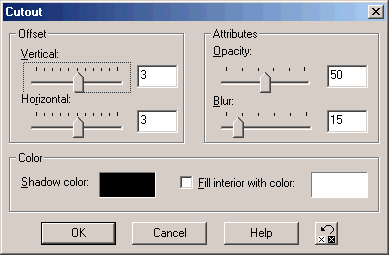
Effects - 3D Effects - Cutout,
my settings see image below..
Deselect ..
 4. 4.
.. you will need "three" feet .. so rightclick
on the "foot"layer, and choose Duplicate, one
more time, so you get three "feet"layer..
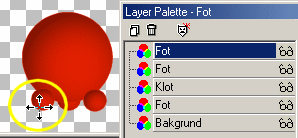
Select one of the "foot"layers and move it
below the "sphere"layer, use the Mover tool 
and move them into position.. see image,
and your layer palette, should look like mine ..
(Bakgrund=Background, Fot=Foot, Klot=Sphere)
5.
 Now you need to create a edge at
the top ... since "Create as vector" is
checked, the edge will be created on its own layer.. Now you need to create a edge at
the top ... since "Create as vector" is
checked, the edge will be created on its own layer..
Create a "Rounded" rectangel the same way, and
with the same colour as the circle.
Hold CTRL and move the upper corner outwards..
 Then choose Then choose
Layers - Convert to Raster Layer.
Selections - Select All
Selections - Float
Effects - 3D Effects - Cutout,
my settings, see image below..
Repeat Cutouten once more,
but change Vertical and Horizontal 2, 2, to -2 and -2.
Deselect ..
~¤ ~ ¤ ~ ¤ ~ ¤ ~ ¤ ~ ¤ ~
6.
Now the candlestick is finished, .. decorate it if you
want ..
For the candle .. I have used these colours ... #FEF5E4 and
#D8AD6A #FEF5E4 and
#D8AD6A
You can if you want, make a candle the same way as you
made the candlestick, use the Preset Shape tool, first a
rectangel , then an elipse.. then use my cutoutsettings..
Or you can use my candle selections, you will find them
in the zip file. I prefer to work with every part of the
candle in its own layer, but you can merge them whenever
you want.. the selections dont have the antialias
checked, becuase you dont get the same results..
Create a new layer. Choose Selections - Load from Disk,
find the light01.sel and fill with the light color.
#FEF5E4. Choose Selection - Float and then choose
Effects - 3D Effects - Cutout, my settings, see image
below
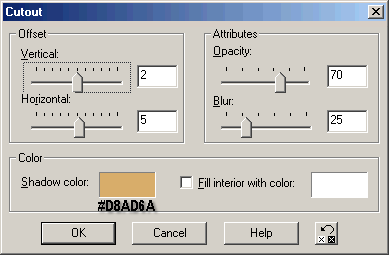
Repeat Cutout once more,
but change
Vertical 2 and Horizontal 5,
to -2 and -5.
Deselect ..
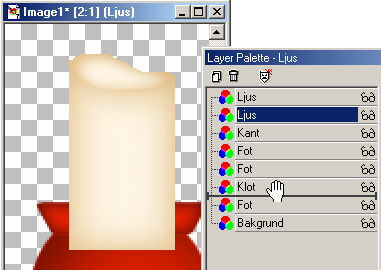
Add a new layer
Repeat and do the same with the light02.sel ,
but change Blur to 10.
Move the first candle layer below the "sphere"layer
.. the candle will "disappear" behind the
candle stick..
(Ljus=Candle)
  7. 7.
The flame..
Chose Selections - Load from Disk,
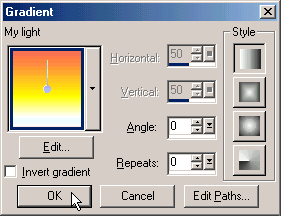
find light03.sel and fill with my gradient,
press OK
Draw a wick with black colour..
Decorate it if you want..
Save
...
*** Note ***
before you merge all layers...
Would you like to try the candelaber or the advents candlestick too ??
Then make a tube of the "foot" and the
"sphere and edge",
Check the layers you dont want to tube, choose
Selections .- Select All,
Edit - Copy Merged, Edit Paste as New Image
File - Export - Picture tube ..

~¤ ~ ¤ ~ ¤ ~ ¤ ~ ¤ ~ ¤ ~
I hope you liked my tutorial ..
good luck !

Thanks to Barbara for the help ..
|


 These are for me "typical"
christmas candlestick to use for christmas,
 ![]()